The iOS App
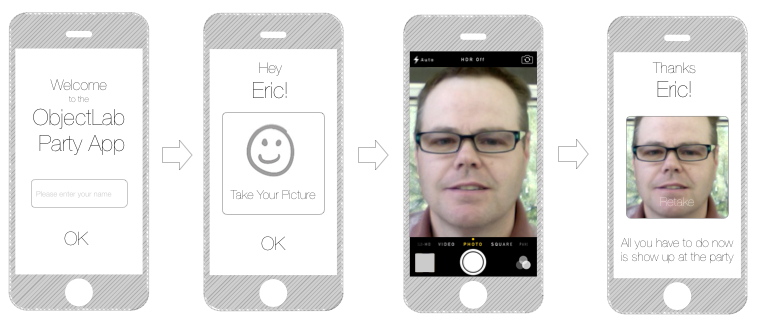
At the point we started to develop the app, we had purchased and configured our Raspberry Pi’s and had tested them with some iBeacon test applications that were available on the iTunes store. Ernst had also put together a series of screen mockups illustrating the main use-cases so we knew generally what we were going to build (although it went back and forth quite a bit.)
We still had many unknowns and very little time to really prove them out:
- we didn’t really know how accurate the translation from signal strength (RSSI) to physical distance would be and how different environments might affect it
- we didn’t completely understand how the APIs worked. There was some code available on github, etc, but none provided a full explanation
- we weren’t sure how the server or the app itself would perform under network service load
- we had no idea if Apple would even accept an app like ours since there wasn't anything like it on the store at the time
We had to eliminate as much technical risk as possible early enough so that we could make a decision about the rest of the engineering. We needed a good starting point.
AirLocate : A good start
As we all know, the best way to learn a new piece of code is to actually see the API’s in action and then take what you
need for your application. At the time, there were some projects on Github (e.g. https://github.com/nicktoumpelis/HiBeacons) that had some of the functionality we needed, but not all of it. We found out about some sample code that
Apple had distributed to developers at the 2013 ADC that implemented about 80% of the features we needed. It’s called
AirLocate(source code here: https://developer.apple.com/library/ios/samplecode/AirLocate/Introduction/Intro.html#//
apple_ref/doc/uid/DTS40013430-Intro-DontLinkElementID_2)
AirLocate demonstrates the implementation of both major usage models: (1) detection of local iBeacons; (2) and configuration of the IOS Device itself as an iBeacon.
AirLocate allowed us to test different combinations of UUID/Major/Minor values and see proximity detections working within Xcode. At this point, we were ready to start building the IOS App.
Design
Ernst has a great way of simplifying most complex things (and is the perfect foil for the rest of us, who preternaturally tend to overcomplicate them). He favored a distilled approach to the application with most UI features contained within a single View with certain features hidden based on the physical location of the user.
Here is an early representation of the UI. We obviously added features but ultimately kept the same spirt of the simple, utilitarian design.

Implementation
The following details the main use-cases illustrated with the final user interface design. An emphasis is made on providing technical details regarding iBeacon API usage within the app implementation. There are many other components not discussed in detail but can found by browsing the source code.
Sign Up

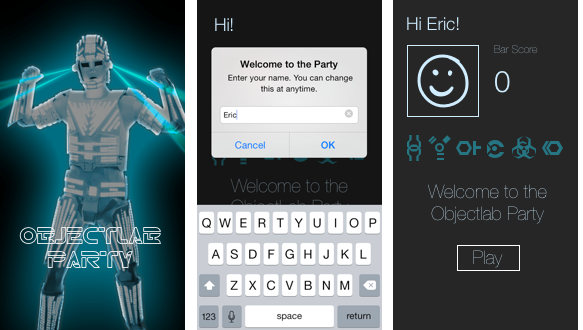
The above shows the splash screen, the registration page, and the initial view. Unless the user was at the physical location or could detect our specific iBeacons, there wasn’t much they could do. They could take a picture and upload it our server, or they could change their user name. This added a bit to the mystery of what we were planning.
Sanity Check: Network
Since the app made a lot of service calls, we had to implement the standard network ‘reachability’ checks as required by Apple for submission. Since we were using AFNetworking (https://github.com/AFNetworking/AFNetworking) we utilized its reachability services;
AFNetworkReachabilityManager *reachability = [HttpClient sharedClient].reachabilityManager;
    [reachability setReachabilityStatusChangeBlock:^(AFNetworkReachabilityStatus status) {
        NSLog(@"reachability changed..... %li", status);
        switch (status) {
            case AFNetworkReachabilityStatusNotReachable:
                NSLog(@"..network not reachable....");
                [_networkUnreachableAlertView show];
                break;


            default:
                break;
        }
    }];
If the network was unreachable, we disallowed both user registration and image uploading.
Sanity Check: Bluetooth
With newer versions of IOS, the bluetooth stack is on by default (presumably to automatically enable apps like ours). However, none of the iBeacon detection would work if the IOS bluetooth manager wasn’t running so we had to check for this also.
On application boot, a singleton class is initialized that implements the CBCentralManager delegate interface. The singleton creates an instance of CBCentralManager and passes itself as the delegate reference. Now the application can receive notifications on Bluetooth state (on/off) which could happen at any time during the execution. The following illustrates how Bluetooth state is tracked by the application:
#pragma mark - CBCentralManagerDelegate
- (void)centralManagerDidUpdateState:(CBCentralManager *)central {
    NSString *stateString = nil;

    switch (central.state) {
        case CBCentralManagerStatePoweredOff:
            stateString = @"Bluetooth is powered off.  If you want to play, go to settings and turn it on.";
            _btReady = NO;
            [self stopMonitoring];
            break;
        case CBCentralManagerStatePoweredOn:
            stateString = @"Bluetooth hardware is powered on and ready";
            _btReady = YES;
               //start the bar beacon region monitoring
                [ self startMonitoring];

            break;
        case CBCentralManagerStateResetting:
            _btReady = NO;
            break;
        case CBCentralManagerStateUnauthorized:
            stateString = @"The app is not authorized to use Bluetooth Low Energy";
            _btReady = NO;
            break;
        case CBCentralManagerStateUnknown:
            stateString = @"The bluetooth LE state unknown, disabling for now.. update pending.";
            _btReady = NO;
            break;
        case CBCentralManagerStateUnsupported:
            stateString = @"Bluetooth Low Energy is unsupported on this platform";
            _btReady = NO;
            break;
        default:
            break;
    }

    if  (stateString) {

        NSNumber *btState = [NSNumber numberWithBool:_btReady];

 NSDictionary *btStateDict = [NSDictionary dictionaryWithObjectsAndKeys:stateString, @"btStateString", btState, @"btState", nil];

[[NSNotificationCenter defaultCenter] postNotificationName:@"Bluetooth Status"
                                                            object:nil
                                                          userInfo:btStateDict];

    }

}
Bluetooth status changes are posted to listeners defined in other parts of the app that disabled or initialized features based on bluetooth state.
Game Play
In order to explain the game play, we need to refresh our memory of what iBeacons are what IOS does with them that make this interesting.
What’s an ‘iBeacon’?
An iBeacon is any Bluetooth LE device that emits information that conforms to a specific standard. Bluetooth Low Energy (LE) (the technology iBeacons are based on) is a connectionless, low power, always (radio) OFF mode that is capable of transmitting small, discrete data chunks with little power consumption (think: temperature, steps taken, etc).
iBeacons are configured to broadcast a small packet of information over the Bluetooth LE channels that are picked up by scanning LE devices (like iPhones).
Generally, the device-specific information is the following:
- Proximity UUID : 16 byte UUID identifier (user-assigned)
- Major Number: 2 byte integer (user-assigned)
- Minor: 2 byte integer (user-assigned)
RSSI : (Received Signal Strength) power setting that will be used to extrapolate a distance setting based on the received BT packet.
The UUID/Major/Minor combination allows some flexibility in deployment allowing you to have detect combinations of each. For example, you can configure all of your devices with separate UUIDs with same major/minor, or the same UUID with different major/minor, or any combination of the three. In order to define the bluetooth LE packet as an iBeacon packet, Apple defines a few bytes of information that must be included in the packet itself so it can be differentiated by the IOS bluetooth driver, and passed up the Cocoa stack to CoreLocation.
CoreLocation
An application can register for proximity updates through the CLLocationManager class (a similar technique utilized for GPS region monitoring). When service wants to receive location notifications, it implements the CLLocationManagerDelegate protocol.
Proximity detection is defined by a UUID (the same UUID that is used to configure the iBeacon device). Here is an example of how this is managed:
 _locationManager = [[CLLocationManager alloc] init];
 _locationManager.delegate = self;

NSUUID *uuid = [[NSUUID alloc] initWithUUIDString:@"E2C56DB5-DFFB-48D2-B060-D0F5A71096E0"];
    _beaconRegion = [[CLBeaconRegion alloc] initWithProximityUUID:uuid identifier:[uuid UUIDString]];

[_locationManager startRangingBeaconsInRegion:_beaconRegion];
[_locationManager startRangingBeaconsInRegion:[[BarTender sharedInstance] barRegion] ];
For the app, we had two proximity identifiers (UUIDs): (1) for two the beacons hidden at the bar; (2) for six the beacons hidden around the bar. Each set utilized its own UUID, but differed by major/minor number.
Proximity Detection
Assuming bluetooth is working, you’ve registered your UUIDs for the beacons you’re interested in, you’re ready to start receiving proximity notifications once you get close enough. The class that implements the CLLocationManagerDelegate protocol will implement the following method to receive callbacks every second, per CLBeaconRegion defined in the CLLocationManager instance:
#pragma mark - CLLocationManagerDelegate
- (void)locationManager:(CLLocationManager *)manager didRangeBeacons:(NSArray *)beacons inRegion:(CLBeaconRegion *)region
{
    //CM should be two beacons if the region is the bar region
    if ([[region.proximityUUID UUIDString] isEqualToString:[[[BarTender sharedInstance] defaultProximityUUID] UUIDString]]) {

        [[BarTender sharedInstance] checkForBarProximity:beacons];
        //return out of this if it's the bar UUID
        return;
    }
    else {
        // claimable beacons
        _rangedBeacons.array = beacons;
        [self.tableView reloadData];
    }

}
Distance : Near, Far, Immediate
As noted, IOS interpolates distance as a function of the RSSI setting passed in the packet (which was supposed to be set during calibration). In the CLLocationManager callback IOS will return it’s interpolated distance with each beacon object in the array of detected beacons. Each beacon in the callback is of type CLBeacon.
The CLBeacon instance contains the UUID, major, minor, and accuracy values. Accuracy is the interpolated distance value in meters.
Here we check to see if the user is within an acceptable distance (6.5m) to any of the bar beacons and update their barscore if necessary.
    for (id myArrayElement in barBeacons) {
        CLBeacon *beacon = (CLBeacon*)myArrayElement;

        if ((beacon.accuracy < BAR_BEACON_THRESHOLD) && 	(beacon.accuracy > 0.0f) ) {
            _needsBarScoreUpdate = YES;
        }
        else
            _needsBarScoreUpdate = NO;
    }
It should be noted that the distance calculated is a factor of many things (not the least of which is interference in the venue) and shouldn’t be relied upon for specific accuracy. This may fluctuate during the execution of your app so it's important to do as much testing as possible, if you plan to use specific distance values. The scalar distance utilized for bar score was the average that I chose after testing the power calibration/RSSI distance interpolation in multiple locations.
IOS does provide some convenience methods to deal with these inaccuracy issues. You can query the found beacon array for any that IOS determines to be ‘near’, ‘far’, or ‘immediate’. This may fluctuate, and Apple doesn’t provide any documentation on how it determines these values but they would be useful if generalized distance is more important than specific distance (in the case of in-store advertisements, for example).
Here is an example (substitute CLProximityFar with CLProximityNear, and CLProximityImmediate):
NSArray *farBeacons = [barBeacons filteredArrayUsingPredicate:[NSPredicate predicateWithFormat:@"proximity = %d", CLProximityFar]];
Finding the Hidden Beacons
Finding the hidden beacons utilized the same techniques as defined above. The only wrinkle we provided was a visual clue of general proximity to the beacon. With each CoreLocation callback, the table of available beacons was reloaded and thus redrawn. Since the distance values changed as the player moved, we modified the position of an image inside of TableViewCell relative to the distance calculated by IOS and the number of pixels in a table cell client area. In order to track state visually between executions of the app, we stored entries for each hidden in a local CoreData storage.
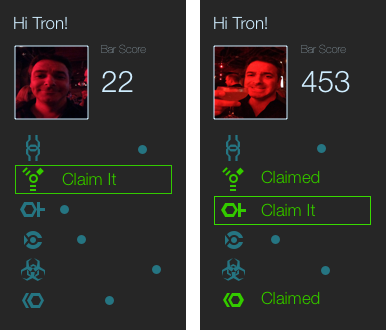
If the user was close enough, the app allowed them to claim the beacon. This was updated locally in CoreData and on the server.

The above images illustrate the UI when proximity to a beacon is identified (‘Claim’). It also illustrates how the table view will display the local state (claimed, claimable, unclaimed) of claim beacons. Note the ‘blue dots’ which indicate distance from the beacon.
Bar Score Updating
Bar score updates followed exactly the same process as hidden beacon claiming, while the app was in the foreground, that is. The one twist with bar score updating is that we didn’t want the app updating their bar score every second. This would have produced too much network traffic. A timer was set to update every 5 seconds. If the user was in the proper vicinity of the bar beacons when the timer fired, their score would get updated on the server. If not, it wasn’t.
We also wanted the bar scoring to be a more passive thing, as opposed to actively hunting for hidden beacons. This required us to think about how to process updates in the background.
Foreground and Background Processing
When the app is in the foreground, everything works pretty much as described. However, processing CoreLocation updates in the background (particularly iBeacon updates at the time), turned out to be slightly different. From what we learned, most of the decisions IOS makes with respect to background processing seem to do with device power management.
First, if you are actively ranging beacons in the foreground and ‘background’ your app, ranging immediately stops. It will, however, restart automatically if you switch to the foreground. However, we assumed that there would be a class of users that wouldn’t be playing the game actively the entire time. Most would probably want to periodically check their score, put the app to sleep, put the phone in their pocket, etc. However, we wanted bar scoring to happen in these passive scenarios. Not only was a cool feature, but bar score detection also drove visualizations depicting who was at the bar.
CoreLocation will allow to monitor regions which could be CLBeaconRegion or CLCircularRegion (GPS) instances. CLBeaconRegion instances may also be identified by the proximity UUID. It’s possible to ask CoreLocation to ‘monitor’ a particular region and notify you when you are either inside or outside of a region. Unfortunately, you can’t really control the radius on CLBeaconRegions, but according to the documentation, it’s roughly equivalent to the standard bluetooth range of 70m, but may fluctuate.
When initializing CLLocationManager you can specify the following with respect to region monitoring and background processing:
 _barRegion = [[CLBeaconRegion alloc] initWithProximityUUID:proximityId identifier:regionID];

 _barRegion.notifyOnEntry = YES;
 _barRegion.notifyOnExit = YES;
 _barRegion.notifyEntryStateOnDisplay = YES;

 [_locationManager startMonitoringForRegion:_barRegion];
This basically tells CLLocationManager to notify me of region proximity on entry of a region, exit of region, and when the iphone display turns on (even if the app is in the background).
You can specify in your application object that you want to receive background location updates. We found that these happen regardless of whether you set this value. We also found that it may take a long time to receive this update (<= 15minutes) if the app is in the background. There is a nice article that confirms this here (http:// developer.radiusnetworks.com/2013/11/13/ibeacon-monitoring-in-the-background-and-foreground.html)
We found that when you are in the background, and receive a location update (either from IOS background manager or when the display turns on), you have about 10 seconds to range any beacons you’re interested in. Here we detect bar beacon proximity as the result of a CLLocationManager update:
- (void)locationManager:(CLLocationManager *)manager didDetermineState:(CLRegionState)state forRegion:(CLRegion *)region
{

    if ([region isKindOfClass:[CLBeaconRegion class]] ) {

        if(state == CLRegionStateInside)
        {

        if ([UIApplication sharedApplication].applicationState == UIApplicationStateBackground)
        {

            //range beacons for 10 seconds..
            [manager startRangingBeaconsInRegion:(CLBeaconRegion*)region];

        }
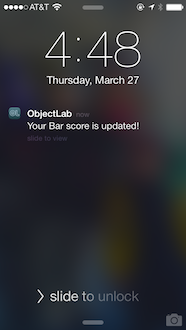
If the app determines that you need a bar score update and you’re in the background, it will execute a network call and update your display with a localNotification. The following illustrates bar score updating in the background that results in a local notification displayed when the phone wakes up.
- (BOOL) updateBarScoreInBackground
{

    // we're using background tasks because normally there is only 5 seconds to do something when transitioning to
    // a background state.  A server update may take longer.

    dispatch_async(dispatch_get_global_queue(DISPATCH_QUEUE_PRIORITY_DEFAULT, 0), ^(void){
    UIBackgroundTaskIdentifier bgTask = UIBackgroundTaskInvalid;

    bgTask = [[UIApplication sharedApplication]
              beginBackgroundTaskWithExpirationHandler:^{
                  [[UIApplication sharedApplication] endBackgroundTask:bgTask];
              }];


    NSLog(@"calling update bar score in background ");
    [self updateBarScore];


    if (bgTask != UIBackgroundTaskInvalid)
    {
        [[UIApplication sharedApplication] endBackgroundTask:bgTask];
        bgTask = UIBackgroundTaskInvalid;
    }

    });

    return TRUE;

}
When you turn on your screen, you see this:

Source Code Available at: https://github.com/objectlab/HolidayParty